

The Manual Ad Sales Bottleneck
If you have ever tried to sell advertising on your BuddyPress community site, you know the pain. An interested advertiser emails you. You reply with your rate card. They have questions. You answer them. They send creative assets in the wrong format. You ask for corrections. They send a revised banner three days later. You upload it manually, configure the targeting, set the schedule, and send an invoice. They pay (eventually). The campaign runs. They want a performance report. You pull numbers from your analytics plugin and put them into a spreadsheet.
The entire process takes hours of back-and-forth for a single campaign. Multiply that by ten advertisers, and you have a part-time job that has nothing to do with running your community. The manual ad sales model does not scale, and it creates a bottleneck that limits your revenue to however many advertisers you can personally manage.
The solution is a self-service ad portal, a system that lets advertisers register, create campaigns, submit creative assets, choose targeting options, pay for placements, and track performance all on their own. You review and approve. That is it.
This is not a hypothetical concept. Platforms like Facebook, Reddit, and LinkedIn all run self-service ad portals. The difference is that with WB Ad Manager Pro, you can build the same kind of system on your BuddyPress site without writing custom code. If you are still figuring out your overall ad strategy, start with our guide on how to monetize your BuddyPress community without annoying members.
What a Self-Service Ad Portal Looks Like
Before diving into the technical setup, let us walk through what the advertiser experience looks like from start to finish. Understanding the complete workflow helps you design a portal that advertisers actually want to use.
The Advertiser Journey
- Discovery: A potential advertiser visits your site and sees an “Advertise With Us” link in the navigation or footer.
- Registration: They create an account or log in with their existing community account. The system assigns them an Advertiser role.
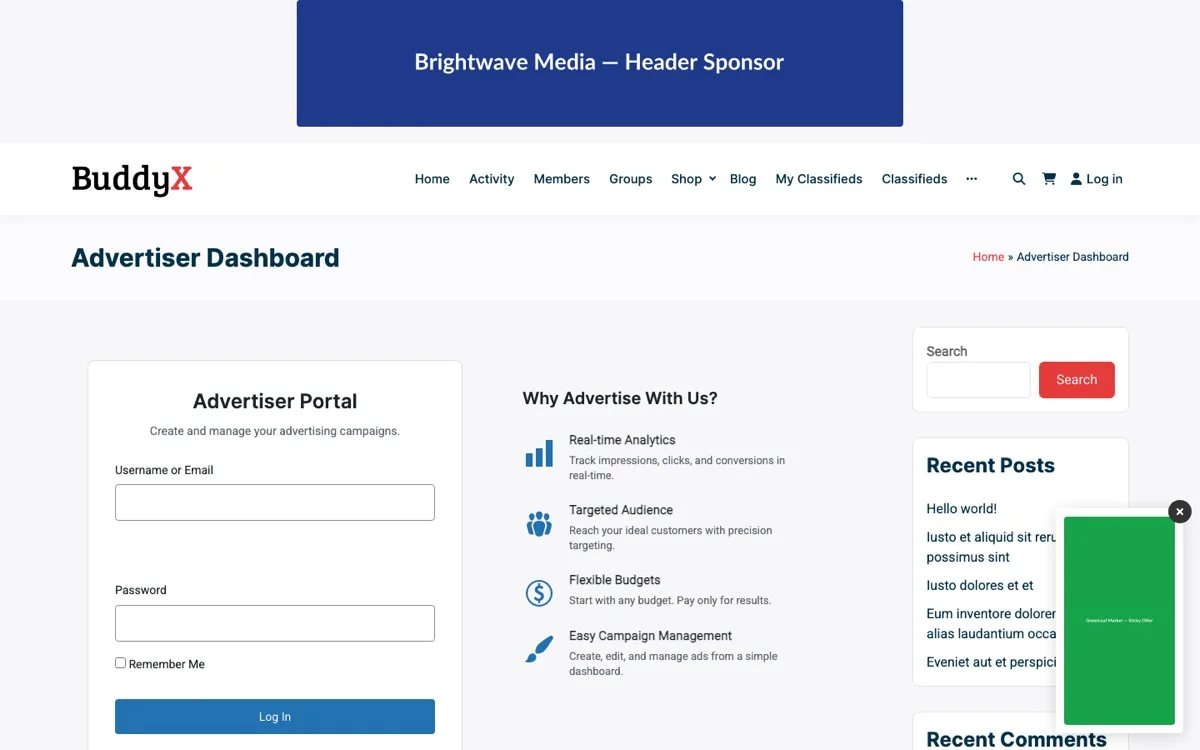
- Dashboard Access: After registration, they land on an advertiser dashboard that shows their campaigns, billing, and performance data.
- Campaign Creation: They click “New Campaign” and fill out a form: campaign name, ad creative (image and text), target URL, desired placement, targeting preferences, budget, and schedule.
- Package Selection: They choose from predefined packages (e.g., “Activity Feed – 10,000 impressions” or “Sidebar – 30 days”) or configure a custom campaign.
- Payment: They pay using their prepaid wallet balance or make a direct payment. The campaign moves to “Pending Review” status.
- Admin Review: You receive a notification about the pending campaign. You review the creative, approve or reject it, and optionally leave feedback.
- Campaign Goes Live: Once approved, the campaign starts running according to its schedule and targeting rules.
- Performance Tracking: The advertiser can log in at any time to check impressions, clicks, CTR, and spend data on their dashboard.
- Renewal: When a campaign ends or a budget is exhausted, the advertiser receives a notification and can renew or create a new campaign.
This entire flow happens without you touching a single email, spreadsheet, or ad configuration panel. Your only involvement is the approval step, which takes 30 seconds per campaign.
Advertiser Registration and Role Management
The foundation of a self-service ad portal is a clean registration and role system. You need to separate advertisers from regular community members, give them access to advertising tools, and keep everything else locked down.
Creating the Advertiser Role
WB Ad Manager Pro creates a dedicated Advertiser role in WordPress. This role has specific capabilities:
- Create and manage their own ad campaigns: Advertisers can create, edit, pause, and delete their own campaigns.
- Upload ad creative: They can upload images and banners for their campaigns.
- View their own analytics: They can see performance data for their campaigns only.
- Manage their wallet: They can add funds and view transaction history.
- No access to admin panels: Advertisers cannot access the WordPress dashboard, other users’ data, or site settings.
Registration Workflows
There are two paths to becoming an advertiser:
Path 1: New Registration
A visitor who is not yet a site member clicks “Advertise With Us” and fills out a registration form. The form collects standard information (name, email, password) plus advertiser-specific fields (company name, website URL, industry). Upon registration, the user is assigned the Advertiser role and redirected to the advertiser dashboard.
Path 2: Existing Member Upgrade
A current community member who wants to advertise can request the Advertiser role from their profile settings. This adds advertising capabilities to their existing account without affecting their community membership. They retain their regular member role while gaining the additional Advertiser role.
Both paths can optionally require admin approval before the Advertiser role is granted, giving you control over who can advertise on your site.
BuddyPress Profile Integration
Since your site runs BuddyPress, the advertiser portal integrates with the profile system. Advertisers get a dedicated tab on their BuddyPress profile that links to their advertising dashboard. This keeps the experience consistent with the rest of the community, advertisers do not need to navigate to a separate area of the site. If you are also running a BuddyPress WooCommerce integration, the advertiser profile tab sits alongside other commerce features for a unified experience.
The profile tab can display:
- Active campaigns with status indicators
- Quick stats (total impressions, clicks, spend)
- Wallet balance
- Links to create new campaigns or view detailed analytics
Ad Submission and Approval Workflows
The submission and approval workflow is where the self-service magic happens. A well-designed workflow ensures that advertisers can create campaigns quickly while you maintain quality control over what appears on your site.
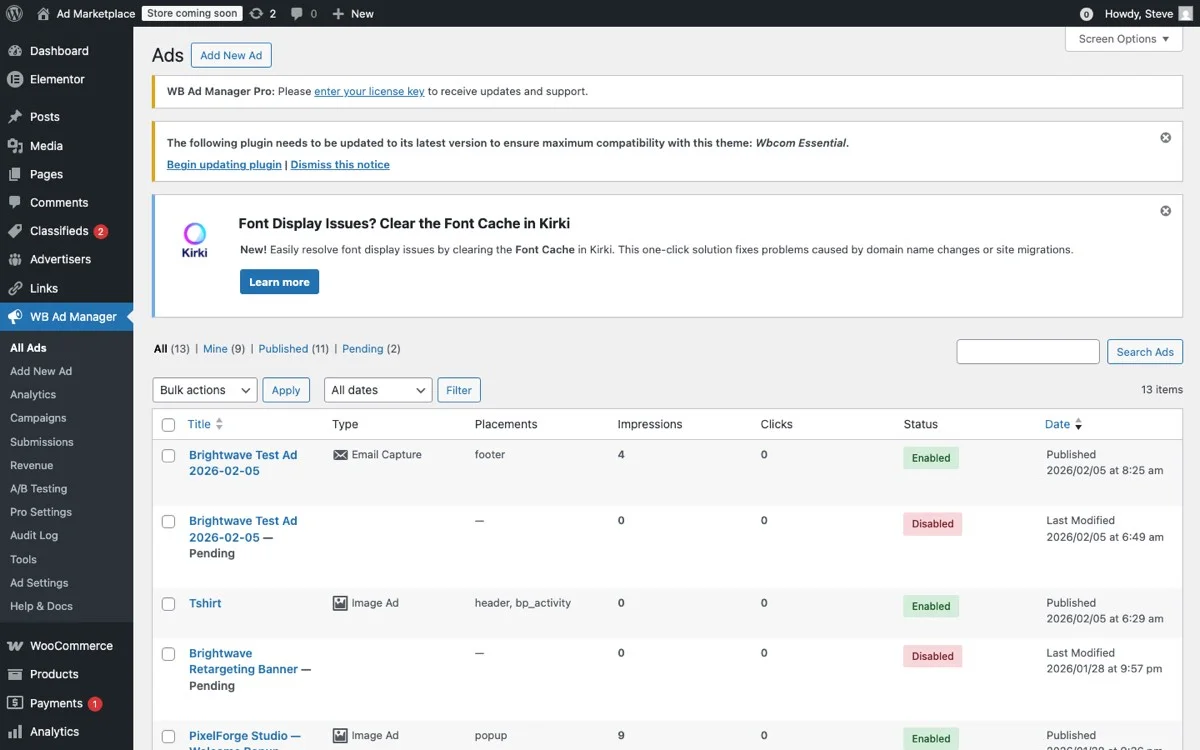
The admin ads list provides a centralized view of all submitted campaigns, making it easy to review, approve, or reject ad submissions from your advertiser portal.
The Submission Form
The campaign submission form is the advertiser’s primary tool. It needs to be comprehensive enough to capture all necessary information but simple enough that non-technical advertisers can use it without confusion. WB Ad Manager Pro provides a front-end form with these fields:
- Campaign Name: Internal label for the advertiser’s reference.
- Ad Type: Banner image, native text ad, or sponsored activity post.
- Creative Upload: Image upload with size guidelines and format requirements displayed inline.
- Ad Copy: Title, description, and call-to-action text for native ads.
- Destination URL: Where clicks should go, with automatic URL validation.
- Placement Selection: Which positions the ad should appear in (activity feed, sidebar, profile pages, etc.). Available placements depend on the selected package.
- Targeting Options: Audience targeting based on user roles, group memberships, or geographic location (depending on your configuration).
- Schedule: Start date, end date, and time-of-day preferences.
- Budget: Total budget or daily budget cap, depending on the pricing model.
Creative Guidelines and Validation
Prevent bad creative from clogging your moderation queue by enforcing guidelines at the submission stage. Make sure your portal is fully mobile-friendly so advertisers can manage campaigns from any device. WB Ad Manager Pro validates:
- Image dimensions: Ads must meet minimum and maximum size requirements for the selected placement.
- File size: Images cannot exceed a configurable maximum (e.g., 500KB) to ensure fast page loads.
- File format: Only approved formats (JPG, PNG, WebP, GIF) are accepted.
- Text length: Ad copy fields enforce character limits to prevent overflow in ad templates.
- URL validation: Destination URLs are checked for proper formatting and optionally scanned for malware or prohibited domains.
The Approval Queue
When an advertiser submits a campaign, it enters the approval queue. As a site administrator, you receive a notification (email and/or dashboard notification) with a summary of the submission. From the admin panel, you can:
- Preview the ad: See exactly how it will appear in each selected placement.
- Approve: The campaign moves to “Scheduled” or “Active” status and starts running according to its schedule.
- Reject: The campaign is returned to the advertiser with a rejection reason. The advertiser can revise and resubmit.
- Request Changes: Send specific feedback without fully rejecting the campaign. The advertiser can edit and resubmit.
For high-volume sites, you can optionally enable auto-approval for trusted advertisers who have had multiple campaigns approved without issues. This reduces your moderation workload while maintaining quality for new advertisers.
Packages and Pricing Tiers
Predefined packages simplify the buying process for advertisers and ensure predictable revenue for you. Instead of forcing advertisers to configure every detail of their campaign from scratch, packages bundle placement, duration, and volume into easy-to-understand options.
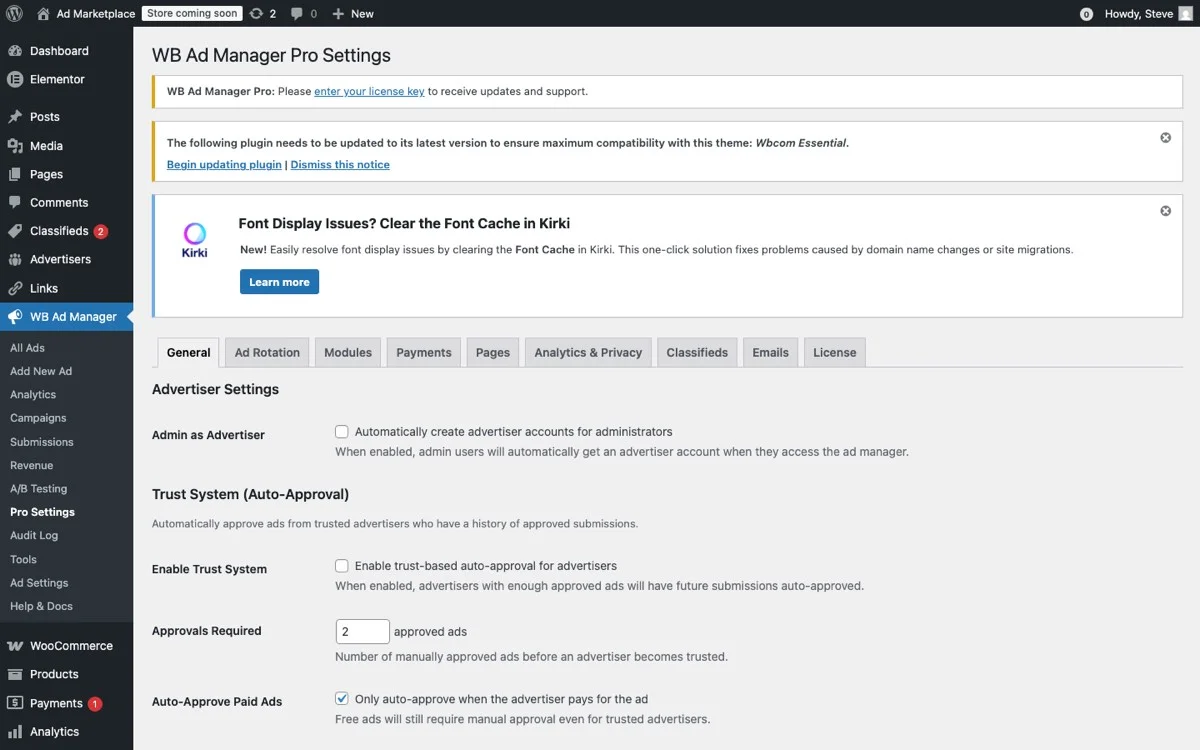
The Pro Settings panel gives you full control over package configuration, pricing tiers, and advanced ad management options for your self-service portal.
Designing Your Package Structure
A three-tier package structure works well for most community sites:
Starter Package ($25/week)
- Sidebar banner placement only
- Up to 5,000 impressions per week
- Basic targeting (all members or specific roles)
- Standard analytics (impressions and clicks)
Growth Package ($75/week)
- Activity feed placement + sidebar banner
- Up to 20,000 impressions per week
- Advanced targeting (roles, groups, geographic)
- Detailed analytics with daily breakdowns
- Priority placement in the feed rotation
Premium Package ($150/week)
- All placements: activity feed, sidebar, profile pages, group pages, member directory
- Up to 50,000 impressions per week
- Full targeting options including custom audience segments
- Real-time analytics with hourly breakdowns
- Dedicated account support
- A/B testing support (run two creatives simultaneously)
Custom Campaign Option
In addition to packages, offer a custom campaign option for advertisers who need something specific. Custom campaigns let advertisers select individual placements, set their own budgets, and configure targeting manually. Price custom campaigns on a CPM (cost per thousand impressions) or CPC (cost per click) basis.
Typical CPM rates for niche community sites range from $5 to $25 depending on the audience value and targeting specificity. A BuddyPress community for software developers, for example, can command significantly higher CPMs than a general interest forum.
Volume Discounts and Long-Term Contracts
Encourage long-term commitments with volume discounts:
- Monthly commitment: 10% discount on any package.
- Quarterly commitment: 20% discount.
- Annual commitment: 30% discount plus a complimentary campaign audit.
Long-term contracts provide predictable revenue and reduce the operational overhead of constantly acquiring new advertisers.
The Wallet Prepay System
The wallet system is one of the most powerful features for running a self-service ad portal. Instead of processing individual payments for each campaign, advertisers load funds into a wallet and campaigns draw from that balance. This model offers advantages for both you and your advertisers.
How the Wallet Works
Here is the wallet workflow:
- Fund the Wallet: An advertiser adds funds to their wallet using a payment method you have configured (credit card via Stripe, PayPal, bank transfer, etc.). Minimum deposit amounts ensure the wallet always has enough for at least one campaign.
- Create Campaigns: When the advertiser creates a campaign or selects a package, the system checks that their wallet balance covers the cost. If sufficient, the amount is reserved (held but not yet deducted).
- Campaign Runs: As the campaign delivers impressions, the system deducts from the reserved amount based on actual delivery. For flat-rate packages, the full amount is deducted when the campaign starts.
- Balance Updates: The advertiser sees real-time wallet balance updates on their dashboard, including reserved amounts and available funds.
- Low Balance Alerts: When the wallet balance drops below a configurable threshold, the advertiser receives an email notification to add more funds.
- Auto-Pause: If the wallet runs out during an active campaign, the campaign is automatically paused until more funds are added.
Why Prepay Works Better Than Post-Pay
Post-pay models (invoice after campaign completion) create several problems:
- Payment collection overhead: Chasing invoices is time-consuming and unpleasant.
- Bad debt risk: Some advertisers will not pay, and you have already delivered the impressions.
- Cash flow gaps: You deliver value immediately but get paid 30, 60, or 90 days later.
Prepay eliminates all of these issues. Money is in your account before the first impression is served. If an advertiser disappears, their remaining wallet balance stays with you (subject to your refund policy). Cash flow is immediate and predictable.
Wallet Configuration Options
WB Ad Manager Pro gives you control over wallet behavior:
- Minimum deposit: Set a minimum wallet load amount (e.g., $25 or $50).
- Auto-reload: Advertisers can configure automatic wallet reloads when their balance drops below a threshold.
- Refund policy: Configure whether unused wallet funds are refundable and under what conditions.
- Transaction history: Full audit trail of deposits, deductions, refunds, and adjustments.
- Multiple payment methods: Support credit cards, PayPal, and manual bank transfers.
Wallet as a Revenue Accelerator
The wallet system also encourages larger upfront payments. When an advertiser deposits $500 instead of $50, they are psychologically committed to spending that money on your platform. This reduces churn and increases lifetime advertiser value. Offering a small bonus for larger deposits (e.g., “Deposit $200 and get $220 in ad credits”) further incentivizes bigger wallet loads.
Setting Up Your Portal: A Step-by-Step Guide
Here is a practical implementation plan for launching your self-service ad portal:
Phase 1: Foundation (Week 1)
- Install and activate WB Ad Manager Pro.
- Configure the Advertiser role and registration form.
- Set up the front-end advertiser dashboard page.
- Connect your payment processor (Stripe or PayPal) for wallet funding.
- Configure basic ad placements (activity feed and sidebar to start).
Phase 2: Packages and Policies (Week 2)
- Create your package tiers with clear pricing and inclusions.
- Write advertiser guidelines: acceptable content, image specs, prohibited categories.
- Set up the approval workflow and notification templates.
- Configure wallet settings: minimum deposit, auto-pause, low balance alerts.
- Create an “Advertise With Us” page with package details, audience stats, and a registration CTA.
Phase 3: Soft Launch (Week 3-4)
- Invite 3-5 existing advertisers or community members to test the portal.
- Gather feedback on the registration, submission, and payment flow.
- Fix any friction points and refine the user experience.
- Run test campaigns to verify ad delivery, tracking, and billing accuracy.
Phase 4: Public Launch (Month 2)
- Add the “Advertise With Us” link to your site navigation and footer.
- Announce the ad portal to your community via email and activity feed post.
- Reach out to potential advertisers in your niche with a personal pitch.
- Monitor the first wave of self-service signups and optimize the funnel.
Maximizing Portal Revenue
Once your portal is live, focus on these strategies to maximize revenue:
Build an “Advertise With Us” Landing Page
Your advertising sales page should include:
- Audience demographics: Who your members are, their interests, and their purchasing power.
- Traffic statistics: Monthly page views, unique visitors, average session duration.
- Engagement metrics: Daily active users, average posts per day, group activity levels.
- Placement examples: Screenshots of each ad position with sample ads.
- Package comparison table: Clear side-by-side comparison of your tiers.
- Testimonials: Quotes from existing advertisers about their results.
- CTA: Large, clear “Start Advertising” button that goes to the registration page.
Nurture Advertiser Relationships
Self-service does not mean no-touch. The best ad portals combine self-service efficiency with strategic relationship management. Send monthly performance summaries to active advertisers. Reach out proactively when you see an opportunity to improve their campaigns. Offer renewal discounts to long-term advertisers. You can also boost engagement using gamification strategies that keep both members and advertisers invested in the community.
Expand Your Inventory
As demand grows, add new placement options: sponsored email newsletter spots, featured listings in the member directory, promoted group recommendations, and custom content sponsorships. Each new placement type is a new revenue opportunity that existing advertisers can access through the same self-service portal. For forums specifically, explore our guide on native ads in bbPress forums for advanced placement techniques.
Wrapping Up: From Manual Headache to Automated Revenue
A self-service ad portal transforms advertising from a manual chore into an automated revenue channel. Instead of being the bottleneck in every ad transaction, you become the curator, reviewing submissions and maintaining quality while the system handles registration, payment, delivery, and reporting.
The economics are compelling. A community site that manually manages 10 advertisers and earns $1,000/month in ad revenue can realistically grow to 50+ self-service advertisers and $5,000+/month with the same administrative effort. The portal removes the scaling constraint that manual processes create.
WB Ad Manager Pro provides the complete infrastructure for building this portal on your BuddyPress site: advertiser registration, front-end campaign management, approval workflows, wallet-based payments, and performance analytics. All integrated with the BuddyPress profile system your members already know.
Stop trading hours for ad revenue. Build a self-service portal and let your advertising scale itself.