Do you want to give your BuddyPress members the ability to add status and moods for activities just like Facebook?
The major role of social media accounts is to let users create an online presence so that they can share their interests, beliefs, likes and dislikes with the world. Also, nowadays these social media accounts allow users to post status and moods on various activities, comments, status on their accounts. In this article, we will tell you how you can add status and moods to BuddyPress website.
Pros Of Posting Status Updates And Moods On Social Media
A social networking website such as Facebook allows its members to post their thoughts in the form of status updates, update their pictures, add moods to certain updates and anything else that they would want their friends to know.
These posts, likes, and moods appear on their activity feed and are visible to their friends. Few pros of posting status updates and moods on social media website include:
1. Status updates can communicate with a lot of people at the same time.
2. Allowing your site members to post status updates and moods can also improve their engagement on your site. They tend to spend more time on the community.
3. Also, offers a richer social experience than sending emails and messages.
4. Adding moods to your community makes your community fun, interactive and engaging.
Adding Status Update To BuddyPress Community
By default, BuddyPress community allows its members to post updates on their profile which then appears on activity stream to their friends in the community. But it does not allow to allow members to set a status, post moods and smileys beside their username.
To do so, you will have to install and activate BuddyPress Status plugin. This plugin is a dedicated BuddyPress addon that allows your community members to update their status and post smileys such as emojis that appear beside their username on their profile. To install this plugin, you can see this guide on how to install BuddyPress Status.
Once you have installed the plugin, you will be required to configure its settings. Here you will find two major settings:
Status icons: With the help of this setting, an admin can set the icons he wishes to display at the frontend to his site members from an available set of emoji.
Activity Reaction Icons: This setting allows you to set reaction icons to give reactions to activity updates.
General Settings: General settings allow an admin to disable status icons for certain components. These include:
- Disable status icon in activity loop
- Disable status icon at the user profile page
- Disable reaction icon in BuddyPress activity actions
Frontend Options:
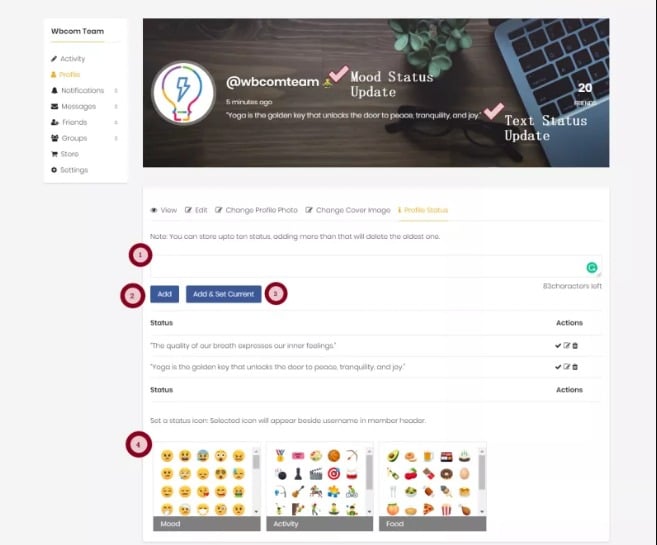
You can update your status from your profile page where you will find a status tab that will allow you to update status.
Write your status in the text box and click on the ADD button to save the status for the future. You can store up to ten status, adding more than that will delete the oldest one.
Click on Add and Set Current button, in order to instantly update the status.
Set a status icon: the Selected icon will appear beside username in member header.
See the plugin live in action
We hope you like this article on BuddyPress Status and Reactions. If you have any suggestions for us, let us know in the comment section below.
Interesting Read: How To Use Hashtags On Your BuddyPress Website?


