Want to let your BuddyPress members keep a personal to-do list right on your site? When a team is managing several projects at once, there’s almost always something pending or due on a specific date, and a scattered mess of sticky notes and DMs doesn’t cut it for long.
A built-in to-do list gives your members a simple way to plan and track what needs doing next. The easiest way to add this to a BuddyPress community or intranet is with a dedicated plugin, and that’s exactly what we’ll walk through here.
What Is a To-Do List?
At its simplest, a to-do list is just the set of tasks someone needs to finish on a given day. It exists to do one job well: help you remember what needs doing and give you a plan for getting through it.
Why Add a To-Do List to Your Website
Giving members a to-do list lets them plan ahead, manage a heavier workload, hit deadlines, and stay organized without extra effort. A few concrete benefits:
- Tasks stay organized instead of scattered across messages and notes.
- Members can prioritize what actually matters first.
- Crossing a finished task off the list is genuinely motivating, and keeps people engaged with their own progress.
Adding a To-Do List to Your BuddyPress Website
Here’s how to get the feature running on your BuddyPress-powered community.
First, install and activate the BuddyPress User To-Do List plugin. For the install steps, see our guide on how to install the BP User To-Do List plugin.
Once it’s active, head to the plugin’s General Settings under Dashboard > Todo Items > Settings.
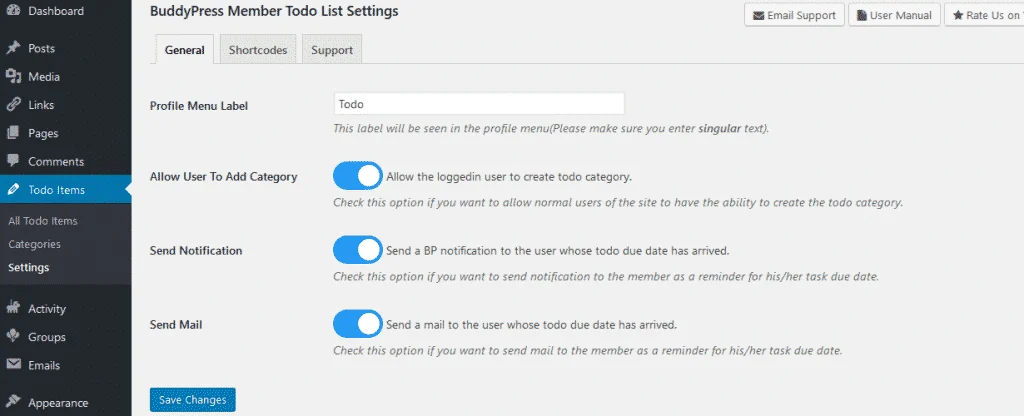
Here you’ll find a handful of settings you can toggle depending on how you want the feature to behave:
- Profile Menu Label: The name that shows up in the profile menu.
- Allow User to Add a Category: Lets logged-in users create their own todo categories.
- Send Notifications: Sends a BuddyPress notification once a todo’s due date arrives.
- Send Mail: Sends an email instead (or as well) when a todo’s due date arrives.
Enable whatever fits your community, then save your changes.
Adding Your First Task
With settings configured, you’re ready to add your first task. Head to your profile, find the new Todo tab, and open it to add an item to the list.
You’ll see these fields:
- Category: Assign the task to a category from the dropdown.
- Title: A short title for the task.
- Summary: Room for any extra detail about what the task involves.
- Due Date: Sets the date the task reminds you about.
- Submit To-Do: Saves the task to the list.
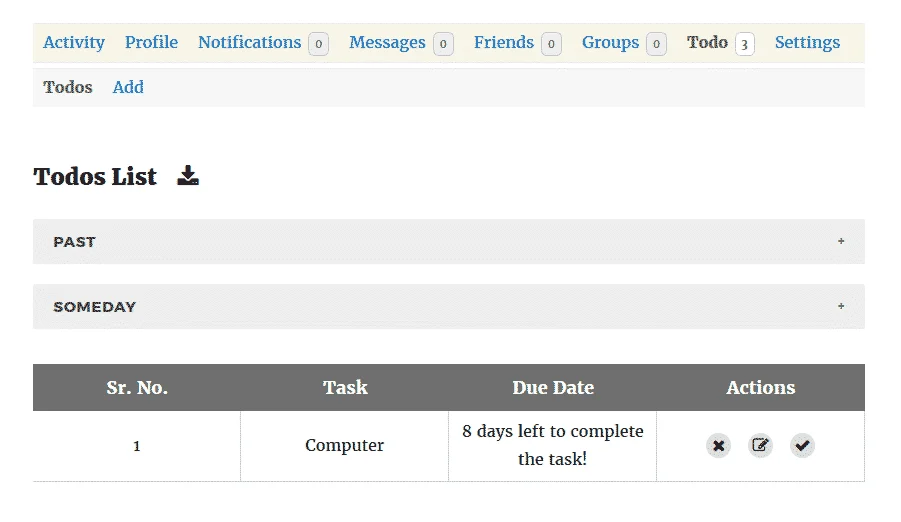
Once submitted, every todo shows up on your profile with a number, task name, due date, and action buttons to edit, remove, or mark it complete. That’s it, your members’ to-do lists are live and ready to use.
Video Tutorial: